

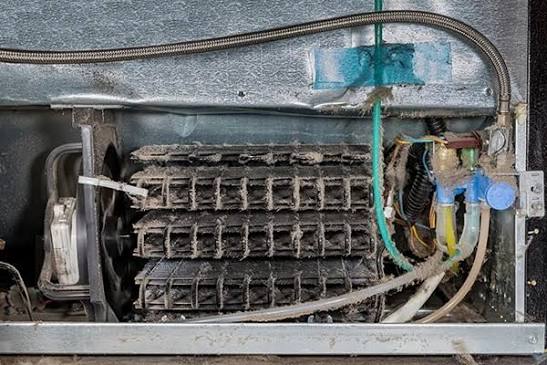
Refrigerator condenser coils release heat from the cooling system. When accessible coils collect dust, pet hair, and debris, airflow can become restricted and the refrigerator may have to work harder to remove heat.
Cleaning dirty refrigerator coils is a practical maintenance task, but coil location and access vary. Your appliance manual should determine the exact procedure.
Find the Coils Before Taking Anything Apart
Depending on the refrigerator, condenser components may be behind a lower front grille, underneath the cabinet, or at the rear. Some modern designs provide limited user access, so don’t remove panels simply because an online tutorial shows a similar-looking appliance.
Check the model-specific manual first. People who regularly browse home-maintenance reading may encounter several cleaning methods, but manufacturer instructions should take priority for the appliance in front of you.
Gather Simple Cleaning Tools
A vacuum with a narrow attachment and a soft coil or appliance brush are commonly useful for reachable dust. Avoid tools that can bend delicate components or push debris farther into inaccessible areas.
Good lighting matters too. Being able to see the coil area reduces unnecessary contact with wires, tubing, fans, and surrounding parts.
Clean Accessible Areas Carefully
Disconnect power before working around accessible refrigerator components if the manufacturer’s instructions call for it. Move the appliance only when it can be done safely without damaging flooring, water lines, or the power cord.
- Remove the accessible grille or cover as directed by the manual.
- Loosen visible dust gently with a suitable brush.
- Vacuum loosened debris without forcing attachments against components.
- Replace covers correctly before returning the refrigerator to normal operation.
General household care content can provide maintenance reminders, but model-specific restrictions matter whenever panels, electrical components, or mechanical parts are involved.
| Area | What to Check | Avoid |
|---|---|---|
| Coil surface | Dust and pet hair | Bending components |
| Vent openings | Blocked airflow | Wet cleaning |
| Floor nearby | Loose debris | Damaging water line |
| Cover or grille | Correct fit | Running with parts loose |
Don’t Ignore Airflow Around the Appliance
Cleaning coils won’t solve every cooling problem. Refrigerator ventilation also depends on installation clearances, unobstructed vents, proper door closure, and reasonable room conditions.
Useful practical household resources may broaden your maintenance checklist, yet cooling trouble should be approached systematically. Check whether the door seals, interior vents, temperature settings, and surrounding airflow appear normal before assuming coil dirt is the only cause.
Where DIY Coil Cleaning Can Fail
The easiest mistake is cleaning aggressively. Thin tubing, fan components, wiring, or fins can be damaged when a rigid vacuum attachment or hard brush is forced into a tight space.
Another mistake is assuming every refrigerator exposes its condenser system for routine owner cleaning. Some models use configurations that shouldn’t be accessed the same way as older exposed-coil designs. If you cannot identify the correct components confidently, stop rather than removing additional panels.
Frequently Asked Questions
How often should refrigerator coils be checked?
The appropriate interval depends on the appliance design, household dust, pets, and manufacturer recommendations. Inspect accessible areas periodically and follow the maintenance schedule in the refrigerator manual.
Can dirty coils cause poor refrigerator cooling?
Restricted airflow around condenser components can make heat removal less efficient. However, weak cooling can also have other causes, including door-seal problems, airflow restrictions, fan issues, or mechanical faults.
Should I pull my refrigerator away from the wall?
Only if the model requires rear access and the appliance can be moved safely. Take extra care with water connections, electrical cords, flooring, and anti-tip or installation requirements.
Keep the Cooling System Unobstructed
A light layer of dust is easier to manage than years of buildup. Identify the correct coil area, follow the manufacturer’s instructions, clean gently, and keep surrounding ventilation paths clear. If cooling remains poor after basic maintenance, avoid repeated disassembly. Persistent problems may need proper appliance diagnosis rather than more cleaning.
